
Solo developer of Spiral Fantasy
Perfecting Unity’s Billboard Shader For Grass – Part 1
Written by Thomas David Walker (TW0)
Rendering the Natural World
In battle, Spiral Fantasy uses Unity’s dynamic terrain system so that attacks and spells leave a real impact. A meteor can leave a crater by changing the heightmap and an earthquake can open a chasm. A fireball or lightning strike could burn away grass and melt snow, revealing the dirt and rock layers beneath. However, treating the world like a battlefield may come at a cost.
The terrain system offers several ways to render grass, with each one having a different use case based on your art style or target platform. Instanced mesh can efficiently render multiple copies of a 3D model to create dense fields of realistic-looking grass, but requires additional work with compute buffers to animate.1 Grass mesh can modify the vertices and normals to animate with the wind, while Vertex Lit mesh uses simpler shading that can work well with games using a low polygon art style.
However, there’s also the option to use a billboard for the grass, which is easier to create as it just requires a texture. This also supports the same effects as the Grass mesh and Vertex Lit mesh such as randomising the height, colour and position of the grass to increase variety and apply wind animation to add realism.
 Legend of Zelda: The Wind Waker (Nintendo) (screenshot by warby)
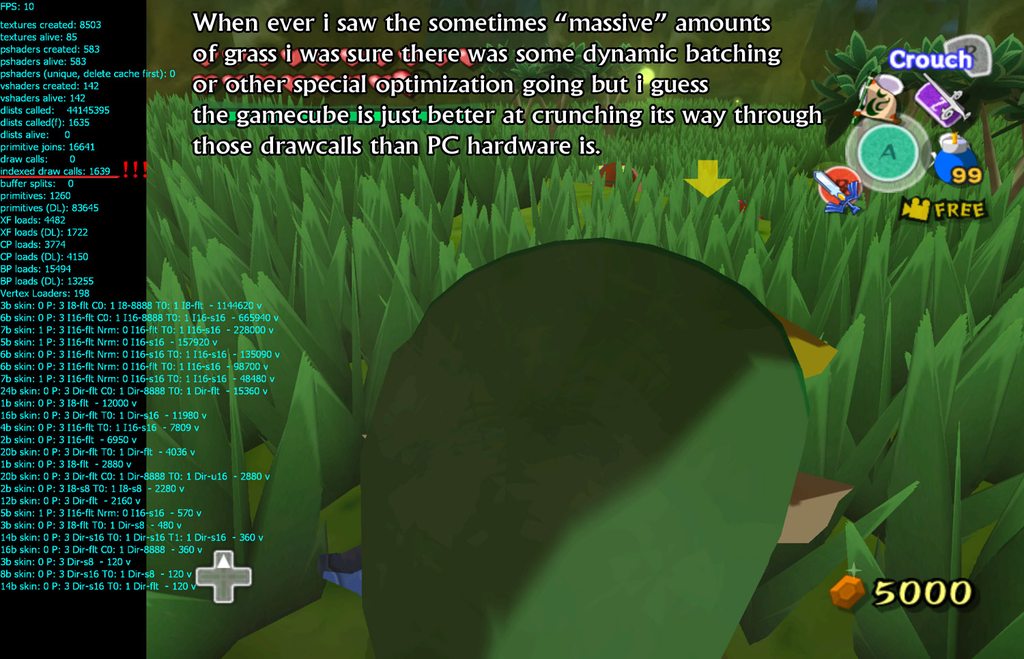
I assumed that games such as The Legend of Zelda: The Wind Waker and Metal Gear Solid 3: Snake Eater used similar techniques to render their grass, but the graphics hardware they ran on were very different to what has become standard today.2 They may have just used brute force, but now most devices can use instancing or batching to render grass with much greater efficiency, allowing for dense grass and longer draw distances even on mobile devices.
Better Billboards
The grass billboard shader can be found in the Project tab at Packages/Universal RP/Shaders/Terrain/WavingGrassBillboard.shader. Make a local copy of all of the files in this folder with “WavingGrass” in their name.
In WavingGrassPasses.hlsl and WavingGrassDepthNormalsPass.hlsl, replace each instance of vertData.clipPos = vertexInput.positionCS; with the following:
// Make quad look at camera in view space
float3 quadPivotPosVS = TransformWorldToView(vertexInput.positionWS);
// Get transform.lossyScale
float2 scaleXY_WS = float2(
    length(unity_ObjectToWorld._m00_m10_m20), // scale x axis
    length(unity_ObjectToWorld._m01_m11_m21)); // scale y axis
float3 posVS = quadPivotPosVS + float3(input.texcoord.xy * scaleXY_WS * input.tangent.xy, 0); // Reconstruct quad 4 points in view space
posVS.xy += input.tangent.xy;
// Complete SV_POSITION's view space to HClip space transformation
vertData.clipPos = mul(GetViewToHClipMatrix(), float4(posVS, 1));
Then in WavingGrassPasses.hlsl, comment out this line as billboarding is now performed by the vertex shader:
GrassVertexOutput WavingGrassBillboardVert(GrassVertexInput v)
{
    ...
    //TerrainBillboardGrass (v.vertex, v.tangent.xy);
    ...
}
Pixel Perfect Grass
Normally we can use point filtering to preserve the sharp pixels in our billboard textures. However, the terrain’s billboard grass seems to ignore the Filter Mode set on the texture so we need to change the sampler used in the shader.
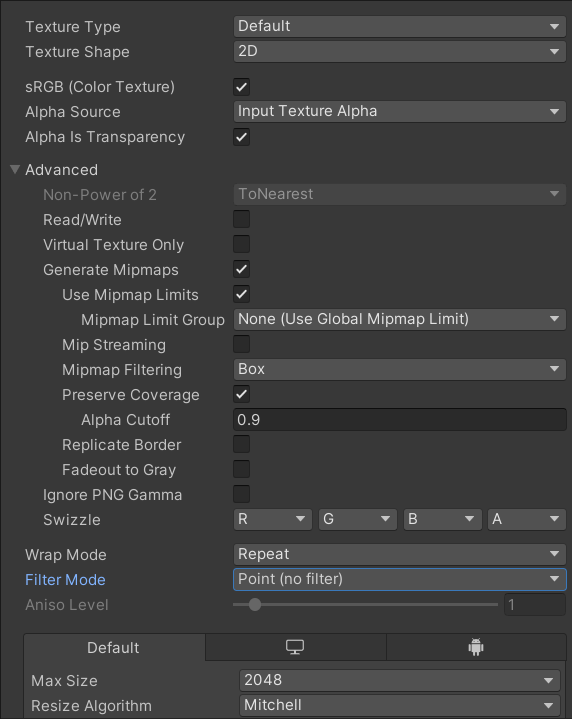
In /Shaders/Terrain/WavingGrassInput.hlsl, replace the sampler with the following:
//SAMPLER(sampler_MainTex);
// The filtering mode on the grass texture is ignored
// Force the shader to use point filtering
SAMPLER(sampler_point_repeat);
Then in /Shaders/Terrain/WavingGrassPasses.hlsl, change the sampler used in this function:
inline void InitializeSimpleLitSurfaceData(GrassVertexOutput input, out SurfaceData outSurfaceData)
{
    //half4 diffuseAlpha = SampleAlbedoAlpha(input.uv, TEXTURE2D_ARGS(_MainTex, sampler_MainTex));
    // Use the point filtering sampler
    half4 diffuseAlpha = SampleAlbedoAlpha(input.uv, TEXTURE2D_ARGS(_MainTex, sampler_point_repeat));
    ...
}
You can control how the sampler behaves by adding sampler states to the name.3 The new sampler uses point filtering and the repeat keyword means that if the texture UV coordinates are outside of the 0-1 range, the texture will be sampled as if there are infinite repeating copies of it.
 Sampler States (Unity Technologies)
In the example above, the shader on the left is using sampler_linear_repeat while the one on the right is using sampler_point_repeat. Note how in the image on the left, artefacts have appeared around the border of the texture. The linear interpolation is blending the pixels at the border with the repeated copies just outside of the image. This is usually what is wanted when applying a repeating tiled texture to a 3D model so you don’t see sharp borders revealing the edge of the texture. This character sprite isn’t supposed to have any data outside of the texture so so using clamp instead of repeat would avoid these artefacts. It’s also recommended to leave a border of at least one pixel around each sprite in pixel art, as in the previous article it was shown that these artefacts can occur even with point sampling when MSAA is enabled.
The Easy Part
Although the billboard shader used by the grass is similar to the one used by the SpeedTree7 billboards, in the Universal Render Pipeline (URP) there is no option to change the shader used by the terrain grass.4
The Built-In Render Pipeline (BiRP) has a feature called Shader Replacement that can be used to override a shader as it is being rendered, even the immutable Unity shaders.5 URP can use the Render Objects Renderer Feature to override a material, but the grass material is created from the shader at runtime and it’s not accessible through scripting.6 Therefore we’ll need to change the shader that the engine uses to create this material.
In Packages/Universal RP/Runtime/Data/UniversalRenderPipelineAsset.cs:
/// <summary>
/// Returns the terrain detail grass billboard shader that this asset uses.
/// </summary>
/// <returns>Returns the terrain detail grass billboard shader that this asset uses.</returns>
public override Shader terrainDetailGrassBillboardShader
{
    get { return editorResources?.shaders.terrainDetailGrassBillboardPS; }
}
Unfortunately, as this is a property instead of a field, it cannot be overridden using reflection. A property is a function that is used to control how a variable in a field can be accessed by another class. This is a public property with a get function but no set function, so it doesn’t give us permission to change it. Often a public property is defined next to the private field that it is providing the interface for, but in this case the field is in another class called editorResources.
In Packages/Universal RP/Runtime/Data/UniversalRenderPipelineEditorResources.cs:
/// <summary>
/// Waving Grass Billboard shader.
/// </summary>
[Reload("Shaders/Terrain/WavingGrassBillboard.shader")]
public Shader terrainDetailGrassBillboardPS;
URP stores several of its shaders in a ScriptableObject in Packages/Universal RP/Runtime/Data called UniversalRenderPipelineEditorResources.asset. As this is in a package from the Unity Registry, it is immutable by default. This means that any changes to the file will be immediately reverted since it no longer matches the original checksum. Changing these packages should usually be avoided because it can introduce a lot of bugs and make it more difficult to upgrade to a newer version of the engine, but there are ways to do it safely.
The following script works in the editor, but when the game is built it’s still using the original shader.7 During the build process the Reload property in UniversalRenderPipelineEditorResources.cs is overwriting the custom shader that’s been added to the editor resources scriptable object.
using System.Reflection;
using UnityEditor;
using UnityEditor.Callbacks;
using UnityEngine;
using UnityEngine.Rendering;
using UnityEngine.Rendering.Universal;

public static class URPShaderReplacer
{
    [DidReloadScripts]
    [InitializeOnLoadMethod]
    public static void InjectShaders()
    {
        //Debug.Log("injecting shader into current pipeline");
        RenderPipelineAsset pipeline = GraphicsSettings.currentRenderPipeline;
        if (pipeline == null) { return; }

        UniversalRenderPipelineEditorResources editorResourceAsset = pipeline.GetType()
            .GetProperty("editorResources", BindingFlags.Instance | BindingFlags.NonPublic)
            ?.GetValue(pipeline) as UniversalRenderPipelineEditorResources;
        if (editorResourceAsset == null) { return; }

        // we replace the billboard shader
        editorResourceAsset.shaders.terrainDetailGrassBillboardPS = Shader.Find("Universal Render Pipeline/Billboard/BillboardCustomDoublePass");
    }
}
There’s one more solution I tried that can be done without modifying the URP package. Both URP and HDRP are scriptable render pipelines, but we are not restricted to what is provided by Unity. We also don’t need to write a new render pipeline from scratch just to change this shader. Instead, we can create a class like the one below that inherits from URP but allows us to override its properties.8
using UnityEngine;
using UnityEngine.Rendering.Universal;

[CreateAssetMenu(menuName = "Rendering/Universal Render Pipeline/Custom URP Asset", fileName = "URP-Asset-Custom.asset")]
public class CustomURPAsset : UniversalRenderPipelineAsset
{
    public Shader detailGrassBillboardShader;

    public override Shader terrainDetailGrassBillboardShader => detailGrassBillboardShader;
}
By creating a new render pipeline asset with this script, we can use it almost as a drop-in replacement for URP but with a new option to override the grass billboard shader. This can be found by selecting the file named URP-Asset-Custom.asset, enabling debug mode in the inspector and adding our shader to detailGrassBillboardShader.
There are two downsides to this method. The first is that any scripts that used reflection to modify settings in the URP asset during runtime will be incompatible. This can be fixed with this simple change:
//System.Type universalRenderPipelineAssetType = (GraphicsSettings.currentRenderPipeline as UniversalRenderPipelineAsset).GetType();
//Replace UniversalRenderPipelineAsset with the name of our new class and add .BaseType to access the parent class.
System.Type universalRenderPipelineAssetType = (GraphicsSettings.currentRenderPipeline as CustomURP).GetType().BaseType;
The other problem is that the build time increases significantly. Whatever optimisations Unity uses such as removing unused shader variants seem to be broken when using this subclass. There may be a way to switch between the default and custom render pipelines to create test builds more quickly, but there’s another method that’s worth trying.
The Solution
Although the source code of the Unity Engine isn’t free to view like the Unreal Engine or under a permissive MIT license like Godot, it is available for external packages such as the scriptable renderer pipelines.910 Creating a local copy of the URP package in your project allows full control to modify and extend it without needing workarounds such as reflection or subclassing. This can be done by moving the package from /Library/PackageCache/ to /Packages/, although there is an editor script that adds the option to right-click a package in the Project tab and select Embed Package.11
If you want to easily share your custom package between different projects or with other people and keep it up-to-date, then you can create a GitHub repo for the package and import it into your project with the Package Manager. Usually you would create a fork from the original repository, in this case Unity’s Graphics GitHub repository,12 but for more recent versions of Unity it’s not easy to find which branch or tag matches the package version in your project. The simplest way is locate the package on your computer by right-clicking Universal RP in the project window and selecting Show in Explorer, and then create a new repository with a copy of those files.
Now we can simply replace the grass billboard shader with our own. However, this opens the door for a lot more possible changes. We can minimise the use of reflection in our code by making private variables public or adding a set function to their property. This also makes it easier to change settings on URP Renderer Features in-game instead of having to use post processing volume overrides. More quality settings in the Universal Render Pipeline Asset can be changed directly, avoiding the need to switch between different quality levels with their own separate assets. Each camera’s TAA quality settings can now be changed, and the improved FXAA 3.11 can be backported from Unity 2023. This is also a great way of adding fixes from newer releases of a package that aren’t supported by your project’s version of the Unity engine.
 Spiral Fantasy - Start Menu (TW0CATS GAMES LTD) (screenshot by TW0)